OpenAI APIs offer powerful capabilities to create intelligent applications, but diving into their features can be overwhelming for a beginner. This guide will walk you through five fundamental steps you need to get started with OpenAI API, helping you understand the essential aspects from account creation to code integration.
Creating an Account
Go to platform.openai.com
The first step to start utilizing the OpenAI API is creating an account at platform.openai.com. This platform serves as the central hub for all your interactions with the OpenAI API, including accessing documentation and managing your account.
Add Payment Information
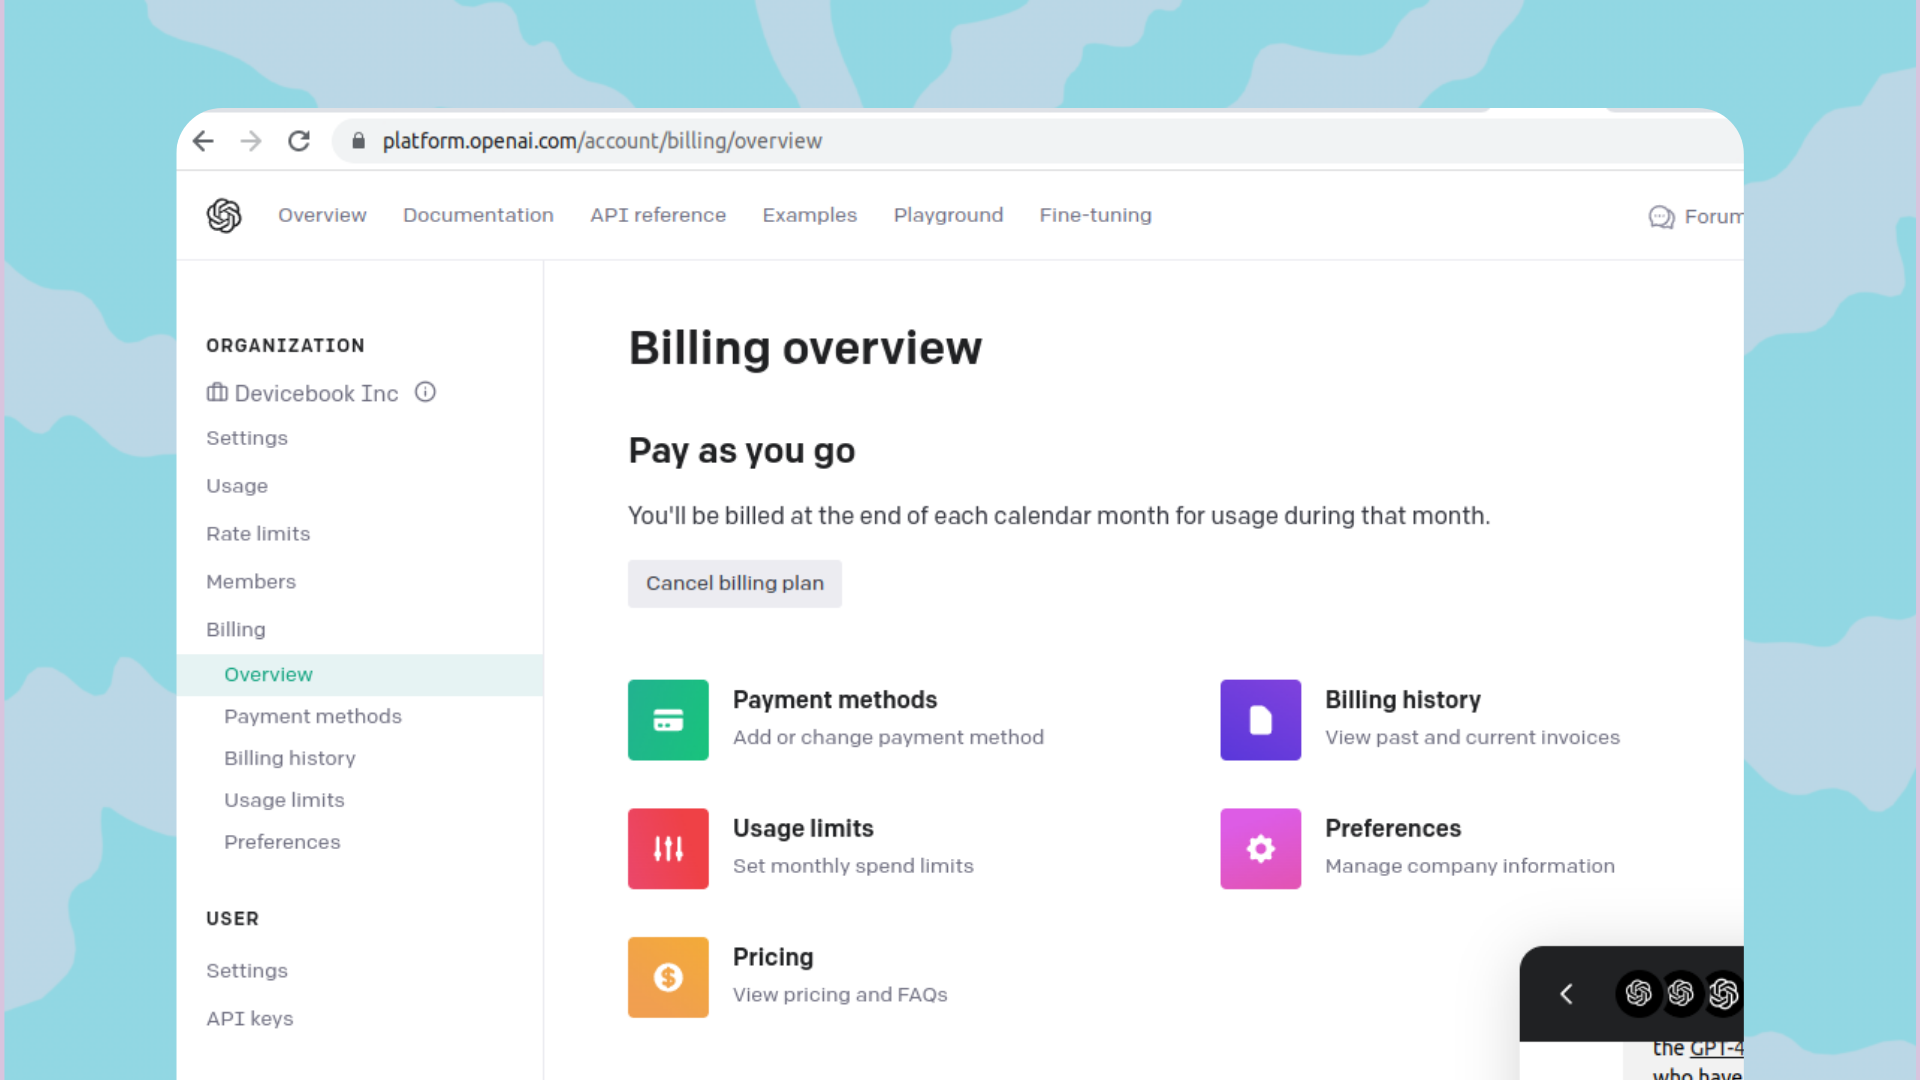 After creating your account, it’s crucial to add your payment information. OpenAI APIs are not free, and providing your payment details ensures uninterrupted access to the API services.
Set Spending Limit
To prevent unexpected costs, you can set a spending limit on your account. Ensure that your spending limit aligns with your budget to avoid any financial surprises.
Access Documentation, Manage Account, etc.
The OpenAI platform also provides comprehensive documentation that you can use to understand various functionalities better, troubleshoot issues, and optimize your applications.
Pricing
Based on Number of Tokens Used
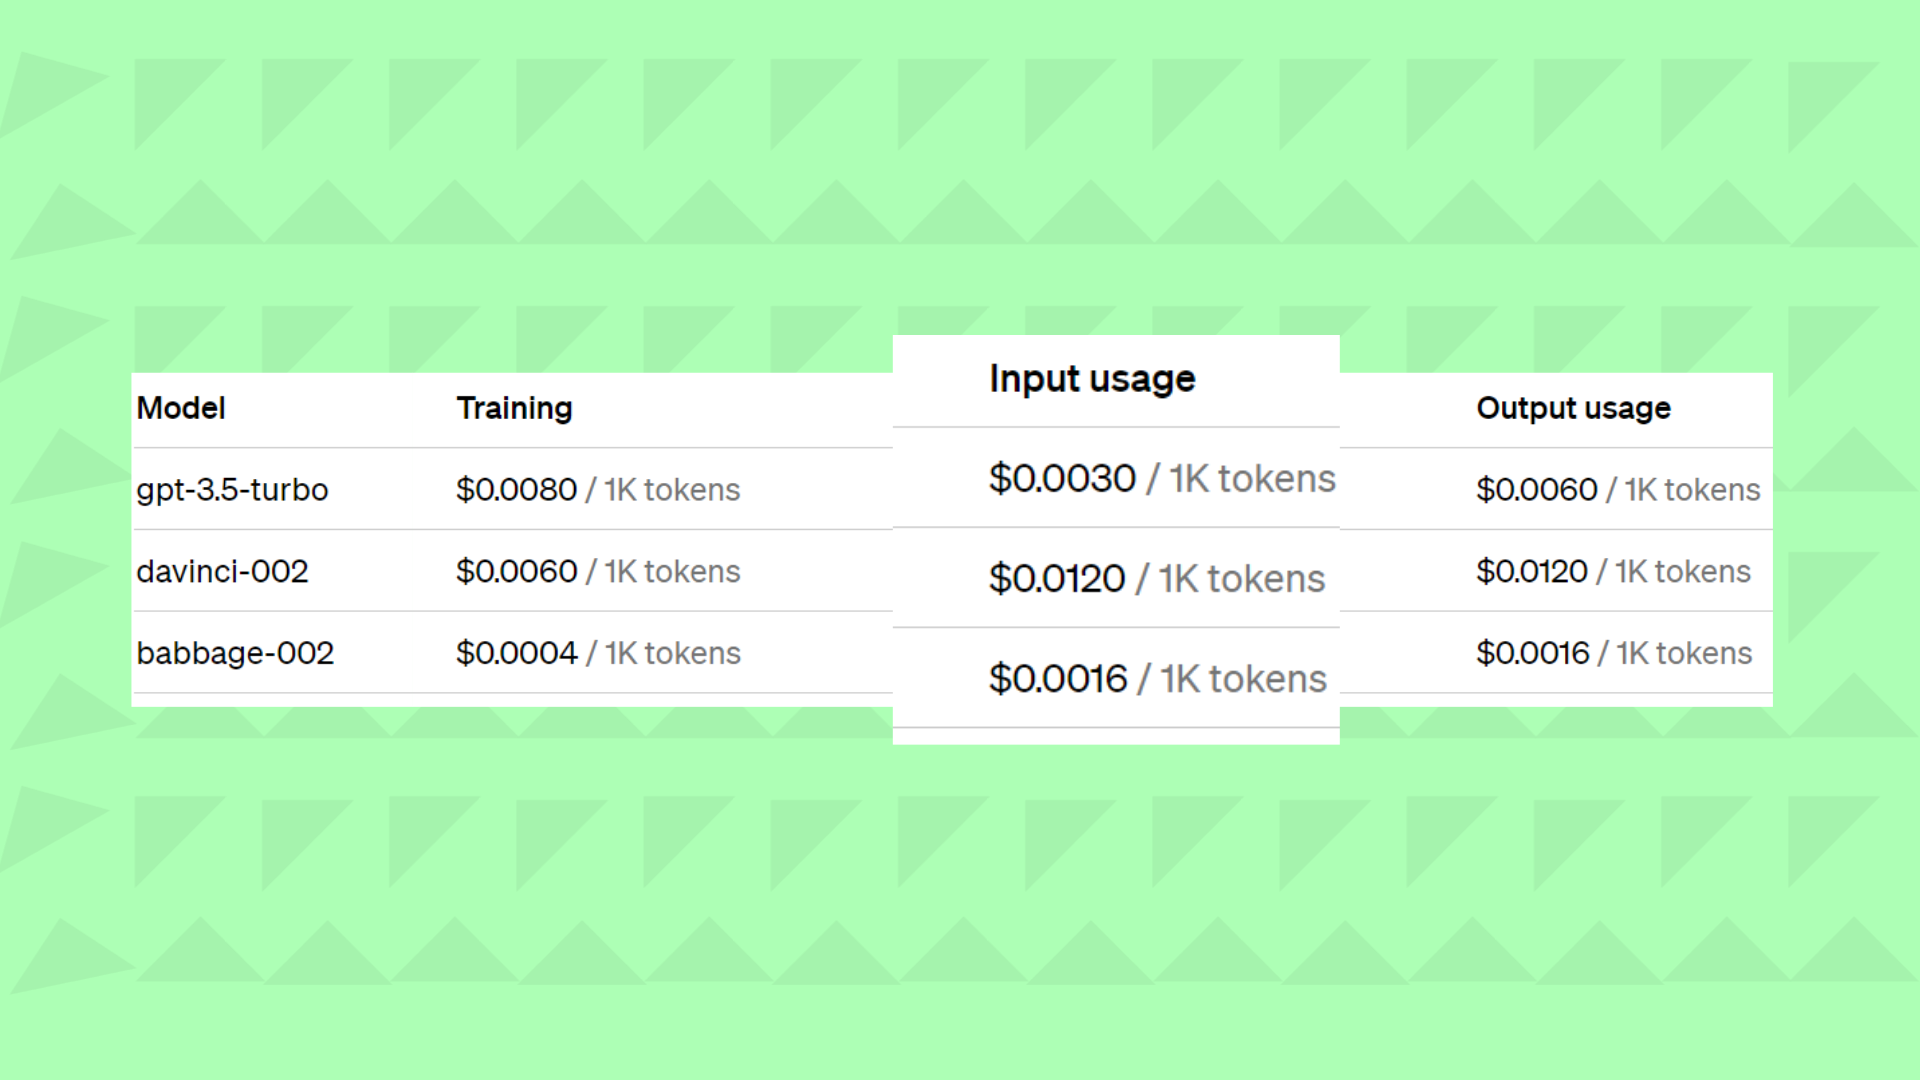
The pricing for using OpenAI API is primarily based on the number of tokens you consume. Tokens represent segments of text, with each token comprising symbols and letters.
Token = Segment of Symbols/Letters
A single word can span 1 to 7 tokens, and sometimes more, depending on the complexity and length.
One Word Can Cost 1-7 Tokens or More
Token costs vary based on the chosen model and purpose of use. Different models have varying token usage efficiencies.
Cost Varies by Model and Purpose
The cost of using different models varies, and the exact pricing details are provided at openai.com/pricing.
Input Token Costs Lower than Output
An important consideration when budgeting is that input tokens generally cost less than output tokens. Thus, you need to adequately estimate costs for both input and output tokens.
Consider Budgeting for Both Input and Output
A comprehensive budget should account for the token costs of both input and output to the API to ensure cost efficiency.
Authentication
API Keys for Authentication
For security, the OpenAI API employs API keys for authentication. These keys are essential for accessing the API services.
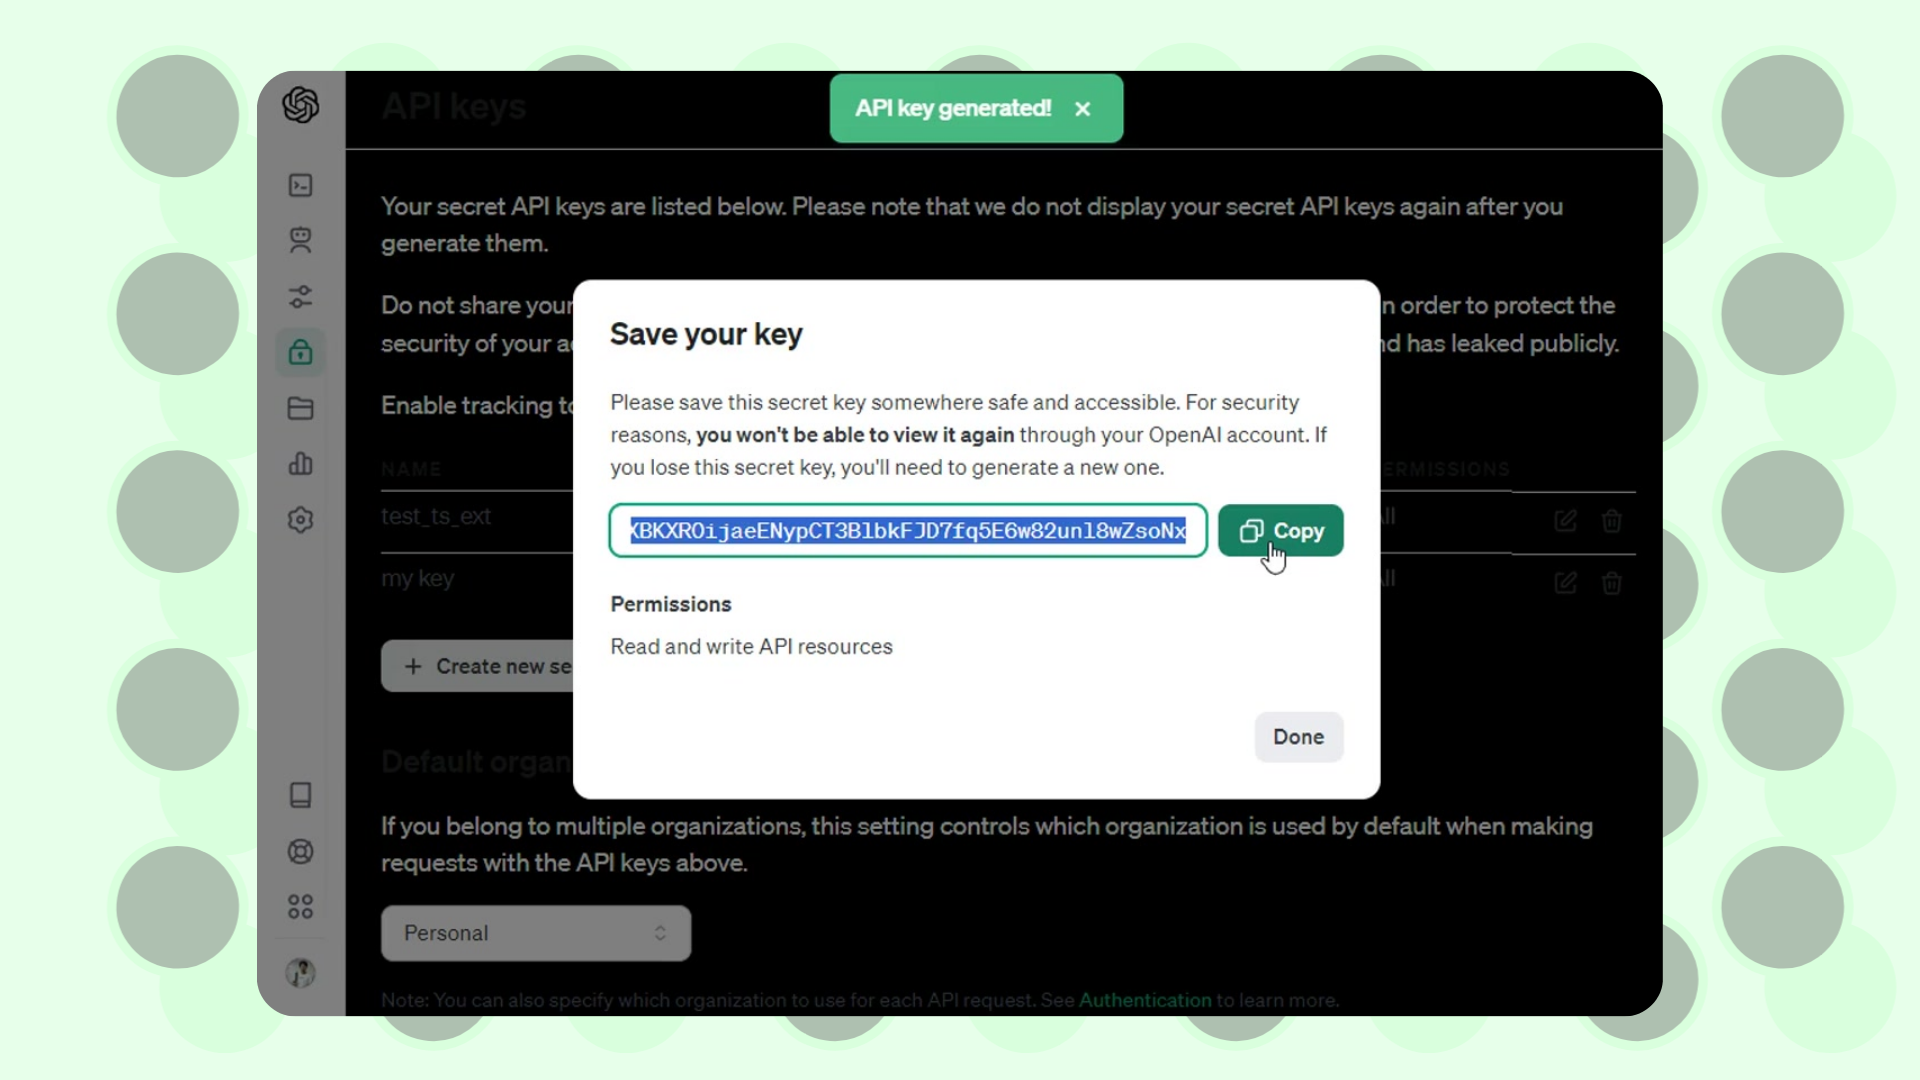
Generate and Manage Keys at platform.openai.com
You can generate and manage your API keys through the OpenAI platform. Each key should be given a descriptive name to easily identify its purpose.
Give Descriptive Name to Each Key
Descriptive names help you manage multiple API keys efficiently, especially if you plan on using the API for various projects.
Copy Key When Generated (Only Time Visible)
Upon generating a new API key, ensure to copy it immediately as it will be the only time it is visible. If you fail to copy it, you will need to generate a new one.
Pass Key as Bearer Token in Request Authentication Header
When making API requests, the API key should be passed as a Bearer token in the request's authentication header.
Securely Store API Key, Especially in Web Apps
It is critical to securely store your API key, particularly in web-based applications where it may become visible in the code. Improper storage can lead to security breaches.
Playground
Excellent for Beginners
The OpenAI Playground is an invaluable tool for beginners to get hands-on experience with the API.
Create Custom Assistants and Chat Setups
In the Playground, you can create custom chat assistants and standard chat setups, giving you complete control over the API parameters.
Control API Aspects like Model Selection, Parameters
The Playground allows you to experiment with various settings such as model selection and parameter adjustments, helping you understand the API's responses to different prompts.
Understand AI's Responses to Different Prompts
Using the Playground, you can gain a better understanding of how the AI responds to various inputs, which is crucial for refining your own application's prompts.
Code Integration
Standard RESTful API, Responds to HTTP Requests
The OpenAI API follows a standard RESTful API design, responding to HTTP requests. This design makes it straightforward to integrate with various coding languages and REST-based methods.
Integrate Using Various Coding Languages and REST Methods
The versatility of the API allows integration with numerous coding languages, providing flexibility for developers.
Specialized Libraries for Python and Node.js
 OpenAI has developed specialized libraries for both Python and Node.js, facilitating easier and more efficient integration.
Python Integration
Install OpenAI Library Using pip
To start, install the OpenAI library in your Python project using pip:
pip install openai
Import OpenAI Library
Next, import the library into your project:
import openai
Create New OpenAI Instance
Create a new instance of OpenAI in your code:
openai.api_key = 'YOUR_API_KEY'
Input API Key
Ensure you securely input your API key:
response = openai.Completion.create(
  engine="davinci",
  prompt="Translate the following English text to French: 'Hello, how are you?'",
  max_tokens=60
)
print(response)
Node.js Integration
Install OpenAI Library Using npm
For Node.js, install the OpenAI library using npm:
npm install openai
Import OpenAI Library
Import the library into your Node.js project:
const openai = require('openai');
Create New OpenAI Instance
Create a new instance:
const api = new openai({});
Input API Key
Input your API key securely:
api.apiKey = 'YOUR_API_KEY';

api.Completion.create({
  engine: "davinci",
  prompt: "Translate the following English text to French: 'Hello, how are you?'",
  maxTokens: 60
}).then(response => {
  console.log(response.data);
});
Includes Helper Functions and Documentation
Both libraries come with helper functions and exhaustive documentation to assist you in leveraging the API effectively.
Practical Code Examples
The libraries also provide practical code examples to aid in understanding and implementing various functionalities.
GitHub Repository with Examples
For additional support, A Github Repository with code examples is available to demonstrate how to implement different features of the OpenAI API.
In conclusion, by following these five steps—creating an account, understanding pricing, proper authentication, utilizing the Playground, and integrating code—you can effectively harness the capabilities of OpenAI API for your applications. Whether you are a novice or an experienced developer, these steps will provide a strong foundation for utilizing OpenAI APIs.
For further adjustments or inquiries, please feel free to leave a comment.